
If you would like to try, Here are the mechanics of how I do my folders on MacSoph who is an Apple computer.
I am Apple-centric and, sorry, I can't help PC-oriented people.
Apple makes scrolling through any folder very easy and enjoyable:
1. Click on the first image in the folder. You see the name of the file and an image.
2. Click on the space bar and the image springs up larger.
3. To scroll through the whole folder, click on the 'down' arrow key (the little 'down' triangle on the lower right of your keyboard).
4. Click click click click through the images of the folder. Notice, since you clicked on the space bar on the first image and it grew larger, all of the images remain larger.
5. Wish to return to an image you just saw? Click the 'up' arrow key (the little 'up' triangle and the images go back up the list.
6. At the end of the folder, when you wish to finish, click on the space bar and the last image will go back into the folder.
7. If you find an image you want to use for a while, option-drag a copy onto your desktop. When you finish referring to it, delete it as the original is still filed and the one on your desk top was just a copy.
The images above? I will write about them tomorrow .
Here are two pairs of pretty faces:
#1 and #2 are very similar.
#3 and #4 are very similar.
Scroll down for my questions and new this morning, my comments.
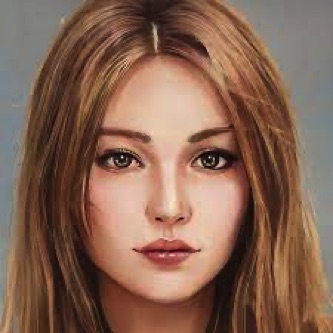
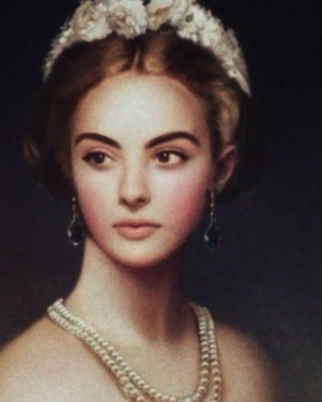
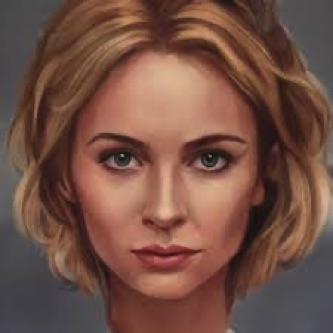
4
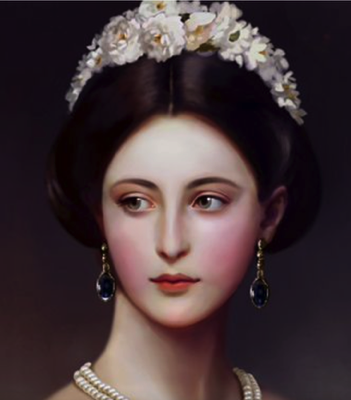
1
3
2
Questions about the Faces Above and My Comments
• Do you see any differences between 1-2 and 3-4?
#1 and #2 look on first glance as if they are paintings from an older era than #3 and #4.
Look at #3 and #4 and they look like contemporary paintings/photos. #3 looks like it might be a painting, #4 looks like a photograph. Not only are the hairstyles more contemporary, but so are the feautres and the way the features are presented. Look at the eyebows on both, look at the position of the eyes, look at the size and presentation of the mouth, the chinline and the blush on the cheeks. Compare these features with #1.
Let's consider the blush on the cheeks: look how much fuller the blush is on #1 than it is on either #3 or #4.
Which face do you like best? Can you tell me why?
• 1 and 2 are very similar. Can you note the differences?
#1 and #2 intrigue me: I think #1 is an older painting and #2 is a more contemporary rendition of #1. Why do I say this? Compare the strucure of the face with #1 and then with #4. Although the lady in the #2 painting looks at first glance like she belongs to the era of #1, look more closely: look at the spacing of the eyes, the position and size of the eyebrows and the shape of the mouth.
To me the features resemble #4 more closely than they do #1, even though the angle of the painting is more like #1 than #4.
• 3 and 4 are very similar. Note the differences?
The countours of the face on #4 are much more pronounced than on #3. If you decide to stitch one of these faces in a medium-small to small format, my guess is you will be much more successful using #3 as your guide. If you add all the contours of #4, I predict you will end up with jagged and less pleasing results.
As you look from #3 to #4, can you see that you will end up with a pretty face whether you use the details or not.
I am back to a theme of simplify.
If you wish to do the contours of face #4, my guess is, you will need a large number of meshes to keep the face from looking disjointed.
• Look at 2 and 4: any similarities?
Above I noted that I see sufficient similarities in the proportions of #2 and #4 that I think #2 is a contemporary rendition of #1.
• Which is the prettiest to you? Why?
Did you have a favorite?
I will write my opinions about favorites in a couple of days.
Did any of you trace a favorite and change her features a bit to see what happens to the image?
FACES LESSON #6
ON COLLECTING.
In this series of lessons, I'm not asking you to turn into a FACES artist; what I am hoping for you is that these lessons will make you more aware of porportions and placements, and it will enhance your idea of what is pretty/beautiful/Beauty-Challenged and give you ideas about small steps you might choose to make your stitching better.
I collect images I like and I store them in a series of folders. Whenever I have questions about details, I consult these folders to see what I can learn. Here are four faces from my FACES folder.
I would like to suggest to you that you too collect images by trolling through Google and Pinterest, taking screen shots of ones you like and save them in a series of folders called 'Designs'.
I have a collection of images on MacSoph and I add to them and refer to them all the time. One of these folders is PEOPLE and inside the folder I have subcategories: FACES, HAIR, JEWELRY, DRESSES, BACKGROUNDS just to name a few. The faces on this page are in a sub sub category called FACES > PRETTY.